Citrix is a College of Engineering resource that is an easy-to-install client software that provides access to the computing tools you'll need to succeed. Whether you are on campus, at home, or on vacation - you will have access via your laptop, tablet, or smartphone to almost every application you can find in the College of Engineering computer labs!
Citrix in the browser
- Go to https://apps.oregonstate.edu.
- Login with your ONID email and password.
Firefox
When prompted, activate the Citrix plugin.
IE
If you already have the Citrix Workspace client, skip the install step and continue to the browser version of Citrix.
Safari
When prompted, select "Trust" to unblock the Citrix Workspace plug-in.
Chrome
Select "Use light version" when prompted to "Detect Receiver/Workspace"
HTML5 Client
The HTML5 Client is used when using the Chrome browser and without using either the Chrome plug-in or desktop application of Citrix Workspace.
To use the HTML5 Client go to https://apps.oregonstate.edu in a Chrome browser and open an application.
When using an application within the HTML5 Client, there is a small icon at the top of the screen that allows for different operations within the client:
 Opens the menu of all the options for the HTML5 client.
 Opens the keyboard for touchscreen and mobile devices.
 Allows for quick switching between apps.
 Opens the clipboard used for copying and pasting.
 Access to the advanced options for the client.
NOTE: Due to the large size of many files, especially CAD files, accessing them directly from a cloud service results in slower operation of the application. The best practice when using the Citrix Desktop platform is to save the file on your Engineering Z:\ drive. This can be done by saving to Desktop or Documents on the Citrix Desktop session or by browsing to your Z:\ drive through File Explorer. If you need to save files through a cloud storage service, please make sure to download them to your Z:\ drive first, then open the files from your Z:\ driveReminder: Citrix does not require the use of a VPN. Using a VPN may throttle your bandwidth and cause the application or desktop to run slower.
How to install Citrix Workspace Client
- Go to https://www.citrix.com/downloads/workspace-app/windows/workspace-app-for-windows-latest.html and download the Citrix Workspace Client.
- From the download location - run the CitrixWorkspaceApp.exe file.

- Do NOT enable single sign-on
- After installation If Citrix does not open automatically, run the Citrix Workspace client from your computer, indicated by this icon

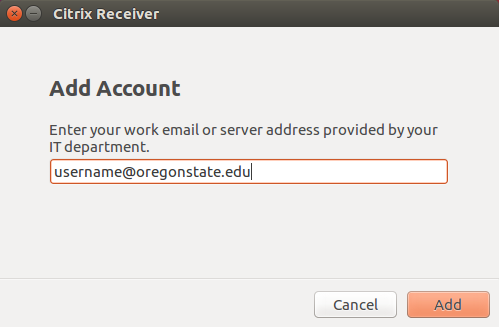
- In the "Add Account" prompt, type in your ONID email into the input box and click "Add".

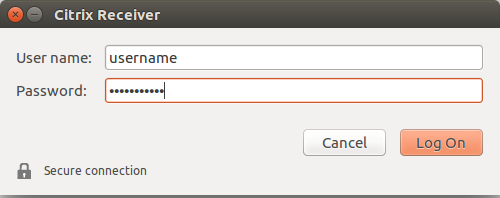
- When asked to connect to apps.oregonstate.edu click "continue". You will be prompted twice to log in.
- In the first prompt, log in with: ONID email and ONID password. You will be prompted for Duo after hitting Log On.

- In the second prompt log in again with: ONID email and your ONID password. Mark the checkbox "Remember my password"

- Go to https://www.citrix.com/downloads/workspace-app/mac/workspace-app-for-mac-latest.html and download the Citrix Workspace Client.
- Mount the downloaded CitrixWorkspaceApp.dmg file.
- From the mounted .dmg file, install the Citrix Workspace.
- At the end of installation, select Add Account.
- If the Citrix Workspace client does not automatically open after installion - run the client from your Applications, indicated by this icon
- In the "Add Account" prompt, type in your ONID email and click "Add". If that doesn't work, put in apps.oregonstate.edu

- When asked to connect to "apps.oregonstate.edu", click continue. You will be prompted twice to log in.
- In the first prompt log in with: ONID\username and your ONID password. You will be prompted for Duo after hitting Log On.

- In the second prompt, log in again with: ONID\username and your ONID password. Mark the checkbox "Remember my password"
iPhone & iPod
- Open Apple App Store and search "Citrix Workspace".
- Install and open the Citrix Workspace app.
- Select "Add Account" and for Address enter your ONID email.
- For Username and Password enter your ONID email and password.
- For Domain enter ONID and select "Log On".
Android
- Open the Google Play Store and search "Citrix Workspace".
- Install and open the Citrix Workspace app.
- Select "Add Account" and for Address enter either apps.oregonstate.edu.
- For Username and Password enter your ONID username and password.
- For Domain enter ONID and select "Add".
- Select the newly added "https://apps.oregonstate.edu" link and login with your ONID username and password.
Chrome Book
- Go to https://apps.oregonstate.edu.
- Log in with your ONID username and password.
How to add and remove applications
There are three tabs in the Citrix Workspace client - "Favorites" "Desktops" "Apps"

Under "Apps" is a list of all the available applications that are avalable to be used through Citrix.
To add an app to your favorite list:
- Navigate to the "Apps" tab.
- Find the app you would like to add.
- Click "details" next to the app.
- This will open a new page and there is a "Add To Favorites" button.

To remove an app from your favorite list:
- Navigate to your "Favorite" or "Apps" tab.
- Find the app you would like to remove.
- Click "details" next to the app.
- This will open a new page and there is a "Remove" button.

How to access local drives while using an app in Citrix

- You can view drives that are currently available by either clicking on 'This PC' or expanding it (as shown in the above photo).
- The local (C:) drive is the one physically in the computer you are using.
- Network drives - connected to your local machine.
- Any storage devices connected to a USB slot on your local machine.
- Network drives - these are the drives that are automatically connected when logging into, for example, a lab computer.
- This includes drives like your (Z:) drive.
Your local Desktop, My Documents, or Downloads is found in your Local (C:) drive (Letter B in the above photo).
- Navigate into the (C:) drive
- Open the Users folder
- Choose the folder with the corresponding account name you use on your Windows machine
- From there you should be able to access your Desktop, My Documents, or Downloads folders.
Your local files can be access by navigating to your User folder in Local Disk (C:):
- Navigate into the (C:) drive
- Open the Users folder
- Choose the folder with the corresponding account name you use on your Mac
- From there you should be able to access your local file locations.
How to use advanced options in Windows
With the Citrix Workspace and one of the applications open, go to the system tray in the lower right right corner of the screen (the small arrow), right click the Citrix Workspace icon and choose "Connection Center".
The preferences option brings up a new window with multiple option tabs:
- File Access: Change whether the application has access to local drives on your computer.
- Connections: Change Microphone and webcam usage settings.
- Flash: Change settings for viewing content that use Flash Player.
How to use the options in 'Citrix Viewer' for the Mac
After opening an application in the Citrix Workspace the 'Citrix Viewer' will be opened. Right click 'Citrix Viewer' in the Menu Bar above and choose "Preferences".
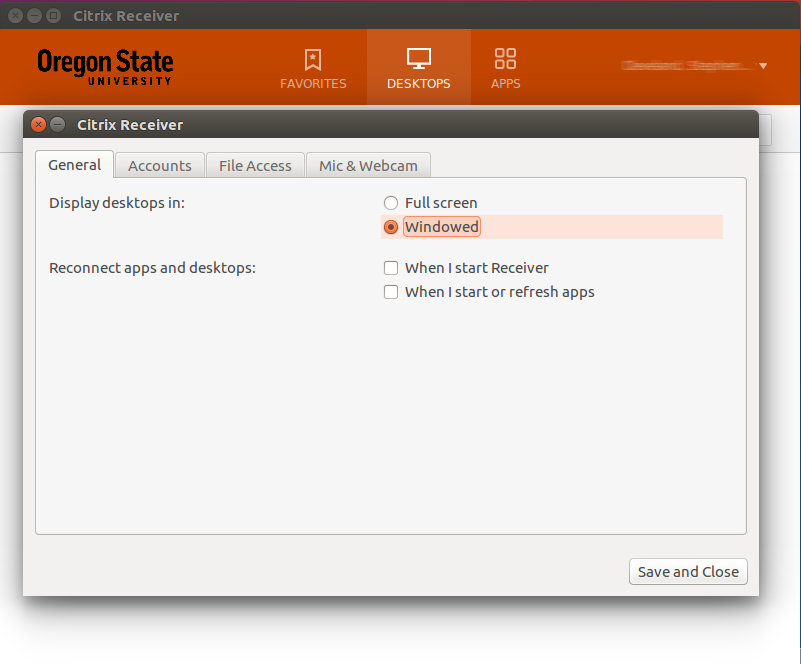
- General: General options for reconnecting apps, showing or hiding the Workspace in the menu bar, and deleting passwords.
- Accounts: Shows which accounts you are connected to and allows to add and remove accounts.
- File Access: Change whether the application has access to local drives on your computer.
- Devices: Connect and use devices in virtual machines that are connected to your computer.
- Mic & Webcam: Change Microphone and webcam usage settings.
- Keyboard: Change keyboard shortcuts to be used in your applications.
When closing the Citrix Viewer you will be given a choice to either "Log Off" or "Disconnect".
- Logging off will end the session
- Disconnecting will leave the session running in the background

Troubleshooting Workspace / Receiver
In the event Workspace is not functioning, there are some common steps you can take to try to fix it yourself.
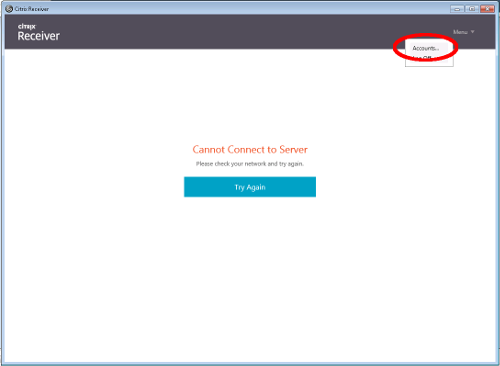
Bad store information
Over the course of our Citrix deployment, the server names have changed (from apps.engineering.oregonstate.edu to apps.oregonstate.edu). This requires removing and readding your account. Instructions vary per platform, but it involves removing the current account and then following the instructions at the top of this document.
Remove account
-
Open Workspace
-
Select the menu option at the top right of the Workspace window
-
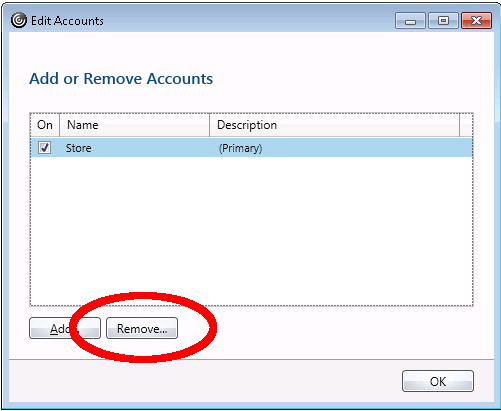
Select any existing stores and select Remove
-
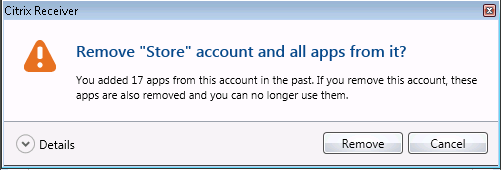
Confirm the removal process. No applications are removed.
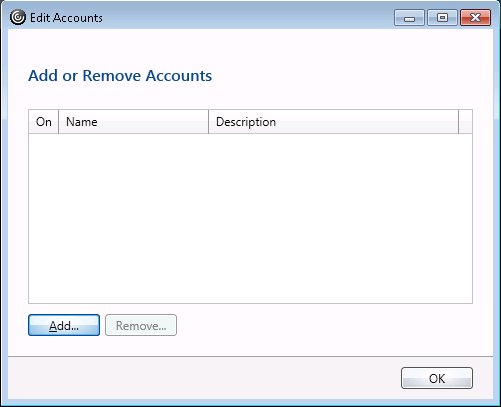
-
You can now add a new account. Click the Add button.
-
Follow the instructions at the top of this document to add the new account.
Reset Receiver
In some cases, you are not able to remove the account or it doesn't fix the issue. Reset Workspace can provide a more thorough cleanup.
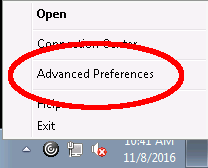
- Right click the Workspace icon in the notification area (it may be hidden) and select Advanced Preferences.
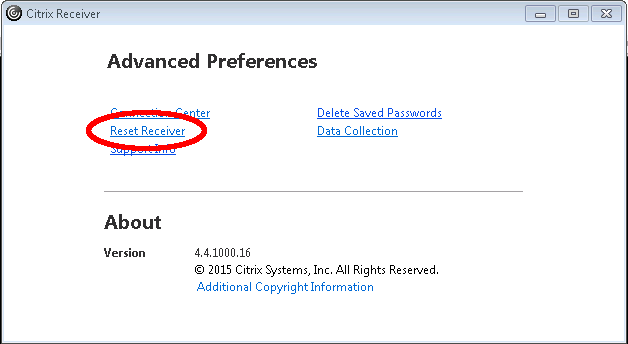
- In the Advanced Preferences window, select Reset Workspace.
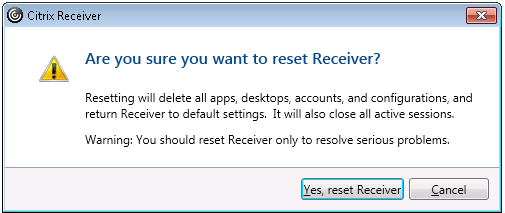
- You will be prompted to confirm Resetting Workspace. Select Yes.
- You should then be at the Add Account screen and you can follow the installation instructions above.
If the reset for the receiver does not solve your problem:
- Uninstall the Citrix Workspace
- Download this utility: https://oregonstate.box.com/s/e1opuhpy95ewfe1e1c1xgy2wl9cv9u68
- Extract the utility and run it.
- Reinstall the latest Citrix Workspace: https://Workspace.citrix.com/
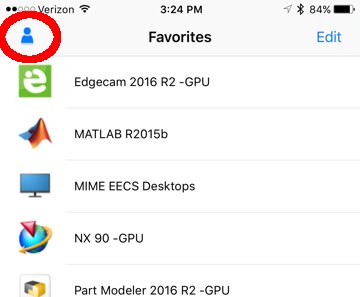
Remove and add account
- In Workspace, click the user icon on the top left. This will give you a list of accounts.
- Click the Information icon to the right of "Store"
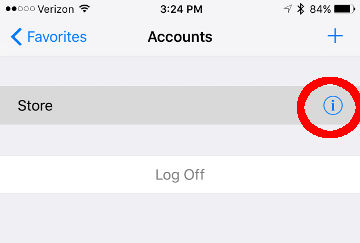
- Click Delete Account
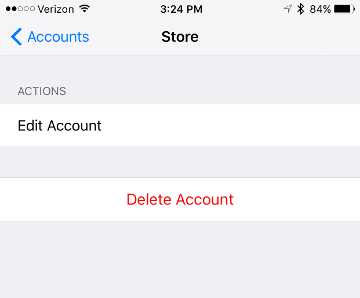
- Follow the instructions above for creating a new account